Pixel Beads Art

From source image to printable pattern

Complete Perler Bead Pattern Generator guide

Turn one image into a printable Perler bead pattern. Follow upload, crop, generation, editing, bead counts, and PNG or PDF export.

No account required10 guided chaptersDesktop and mobile
Open the pattern generator

Step 1 of 10

Understand the workspace

The generator keeps the artwork in the center and moves project controls into focused panels. Desktop panels can be opened independently; mobile controls open from the bottom navigation.

Do this

  1. 1Locate the panel rail on desktop or the bottom navigation on mobile.
  2. 2Open Generate, Edit tools, Layers, Symmetry, Beads, and Export once to learn where each task lives.
  3. 3Return to the center canvas; this is where you zoom, pan, inspect, and edit the pattern.

What each control does

Desktop panel rail

Opens Source, Edit tools, Layers, Generate, Symmetry, Beads, and Export as separate floating panels.

Floating panels

Drag a panel by its title bar, bring it to the front by interacting with it, or minimize it without losing settings.

Mobile navigation

Opens six task sheets: Edit tools, Generate, Layers, Symmetry, Beads, and Export.

Canvas workspace

Shows the editable bead grid and accepts painting, erasing, color picking, zooming, panning, and symmetry placement.

Quick colors

Keeps recent and currently used bead colors close to the canvas so repeated editing takes fewer taps.

1 Panel rail · 2 Editable canvas · 3 Floating panels. On mobile, the same responsibilities move to the bottom navigation.

Expected result

You can point to the panel used for generating, editing, checking bead counts, and exporting without searching through the whole page.

Step 2 of 10

Upload or import a source image

Start with a high-contrast image whose subject is easy to separate from the background. The generator accepts local files and images handed off by the Pixel Beads Chrome extension.

Do this

  1. 1Select Upload image and choose a JPG, JPEG, PNG, or WebP file no larger than 10 MB.
  2. 2If the image came from the Chrome extension, review the source and screenshot warning before continuing.
  3. 3Use Replace image later if you want to restart with a different source.

What each control does

Upload image

Reads a supported local image and opens the crop workflow; conversion does not require an account.

Chrome extension import

Receives an image selected on another web page, validates it, then sends it into the same crop workflow.

Screenshot warning

Explains when an extension import is only a visible-page capture, so you can inspect sharpness and missing edges.

Replace image

Starts a new crop and generation flow with another source image.

Draw manually

Leaves the automatic generator and opens the blank Perler bead art editor for drawing from an empty board.

1 Upload a supported image · 2 Switch to the manual editor · 3 Confirm the file requirements before choosing a source.

Expected result

The crop dialog opens with the selected image visible and no upload-format error.

Step 3 of 10

Choose the image type and crop

Tell the generator whether the source is a photo or an existing pixel grid, then keep only the area needed for the finished bead pattern.

Do this

  1. 1Choose Photo for normal artwork or Pixel pattern for an image that already contains hard-edged square pixels.
  2. 2Drag and resize the crop frame, then adjust Pattern size until the subject fills enough of the target width.
  3. 3Optionally choose an aspect ratio, maximum color count, and initial generation method before generating.

What each control does

Photo

Smooths source sampling and simplifies photographic colors and details into bead cells.

Pixel pattern

Preserves hard pixel edges and attempts to detect and align the original pixel grid.

Crop frame

Removes irrelevant background and changes the composition without editing the original file.

Pattern size

Scales the subject within the cropped area; making it too small can remove recognizable details.

Aspect ratio

Keeps the crop freeform by default or locks it to 1:1, 4:3, or 16:9.

Maximum colors

Caps the initial palette between 1 and 256 colors; leave blank when no manual cap is needed.

1 Resize the crop area · 2 Choose Photo or Pixel pattern · 3 Set subject scale and generation options before continuing.

Expected result

The preview shows the intended subject at a readable size, with the correct Photo or Pixel pattern mode selected.

Step 4 of 10

Generate and refine the pattern settings

The initial generation method controls how source pixels are sampled. The Generate panel then lets you change pattern detail, width, bead size, grid guides, and the real bead palette before regenerating.

Do this

  1. 1Choose the initial method that best matches the source, then generate the first pattern.
  2. 2Open Generate and compare detail mode, grid width, bead size, and bead brand with the intended physical project.
  3. 3Select Regenerate pattern to apply changed settings; confirm before replacing manual canvas edits.

What each control does

Dominant color

Uses the strongest color in each cell. It is a dependable starting point for icons, cartoons, and clear shapes.

Average color

Blends pixels within each cell for balanced gradients and general photographs.

Fast color

Uses the stable legacy path for quick previews with the full selected palette.

Soft palette

Reduces noise, smooths neighboring regions, and favors a smaller, calmer set of colors.

Pixel detail

Keeps more local variation and uses dithering, which helps pixel art and detailed texture.

Precise match

Uses a stricter perceptual color match without dithering when bead color accuracy matters most.

Pattern detail

Detail first and Smooth natural keep broad palette freedom; Simplified, Standard, and Detailed Beta target roughly 8, 10, and 16 colors.

Pattern width

Choose 52, 104, or a custom 10–200 bead width. Height follows the source ratio and is limited to 200 beads.

Bead size

Select 5 mm or 2.6 mm so dimensions and exports match the physical beads you plan to use.

Bead brand

Maps colors to Perler, Hama, Artkal, MARD, Nabbi, or IKEA Pyssla codes; MARD can be restricted to a retail set size.

Reference grid and coordinates

Adds numbered guide lines for counting. You can change minor, reference, and major line colors and intervals.

Regenerate warning

Settings remain pending until applied. Regeneration replaces the current matrix, including any manual edits you confirm overwriting.

Original image01
Original gingerbread character used in the generator demonstration
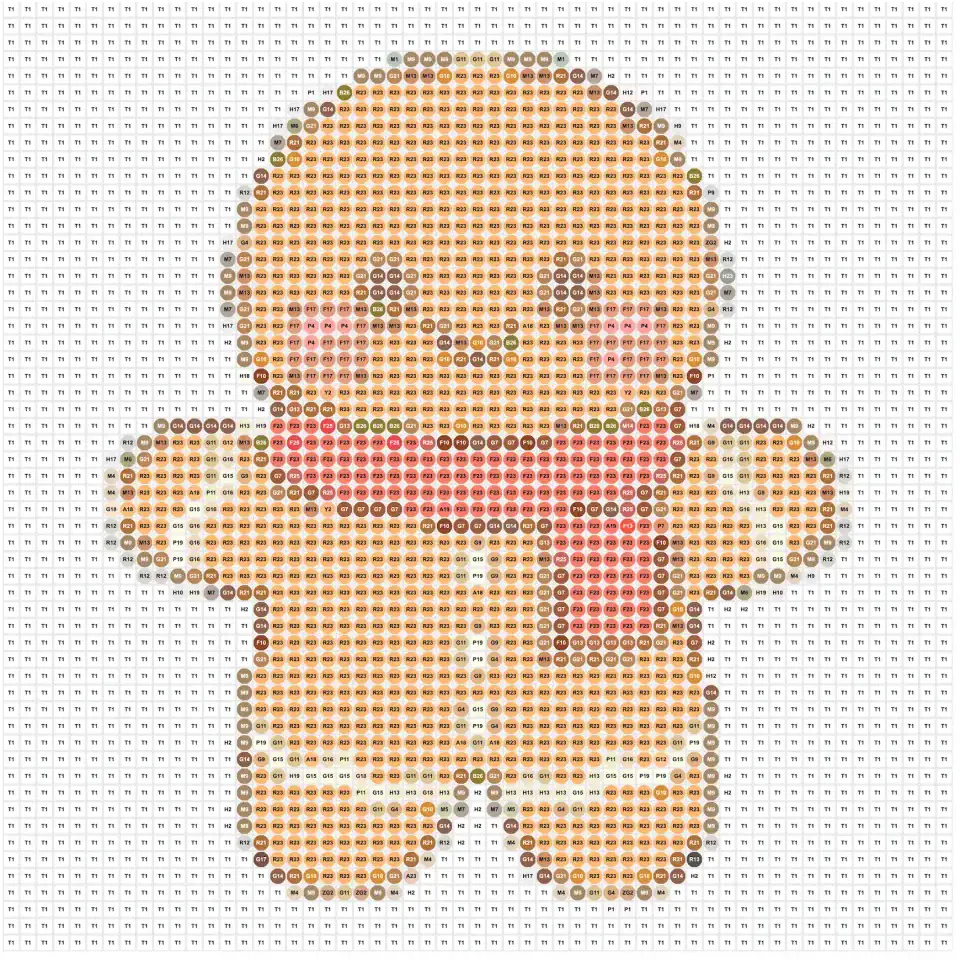
Generated bead pattern02
Generated gingerbread Perler bead pattern with color codes on the grid
The same source becomes a bead-by-bead chart. Grid width, palette, generation method, and later edits determine how much detail and how many colors remain.
1 Choose the detail preset · 2 set physical grid dimensions · 3 choose the real bead palette, then regenerate to apply changes.

Expected result

The bead pattern has a practical physical size, uses the bead brand you own, and preserves the right amount of detail.

Step 5 of 10

Inspect and navigate the canvas

Viewing controls change only how you inspect the workspace. They do not change the bead matrix or exported pattern.

Do this

  1. 1Use the plus, minus, or zoom slider to inspect individual bead cells.
  2. 2Pan by dragging empty workspace; on touch screens, use two fingers to zoom and move the view.
  3. 3Double-click empty workspace when you want to reset the view to its fitted position.

What each control does

Zoom slider

Adjusts user zoom from 50% to 300% while preserving the automatic fit scale.

Wheel zoom

Zooms around the pointer position so the bead under inspection stays near the cursor.

Workspace pan

Moves the board without editing cells when you drag the blank area around the pattern.

Double-click reset

Returns the board to its fitted center and clears manual pan and zoom.

Pinch gestures

Two-finger pinch zooms and pans on mobile; adding a second finger cancels an unfinished draw stroke.

Bead tooltip

Hovering a bead reveals its current color code for quick inspection.

1 Zoom controls · 2 pan and inspect the board · 3 use quick colors without leaving the canvas.

Expected result

You can inspect small color codes and move around a large pattern without accidentally changing the design.

Step 6 of 10

Edit cells and choose colors

Use direct drawing tools for local fixes, the source sampler for color matching, and quick or full palettes for selecting exact bead codes.

Do this

  1. 1Choose Brush, Eraser, or Eyedropper, then choose Single cell or Rectangle fill.
  2. 2Select a quick color or search the full current brand palette by name or code.
  3. 3Paint the required cells and use Undo or Redo if the change is not correct.

What each control does

Brush

Adds the selected bead color by clicking a cell or dragging a continuous stroke.

Eraser

Clears beads from single cells or a dragged region.

Eyedropper

Selects a color already present in the bead pattern without changing the cell.

Pick from source

Samples the original image, ranks the three nearest colors in the active bead palette, and applies the chosen code to the brush.

Single cell

Paints or erases individual cells and continuous freehand strokes.

Rectangle fill

Fills or clears a rectangular selection from the press point to the release point.

Quick colors

Orders recent selections, used pattern colors, and remaining palette colors for fast reuse.

Full palette

Searches and selects any available code from the currently selected bead brand.

Undo and Redo

Moves backward or forward through committed strokes, fills, mirror actions, and color cleanup changes.

Horizontal mirror

Flips the entire current pattern from left to right and adds the change to history.

1 Choose Brush, Eraser, or Eyedropper · 2 select a bead color or sample the source · 3 choose Single cell or Rectangle fill.

Expected result

The edited cells use valid codes from the current brand palette, and the change can still be undone.

Step 7 of 10

Use color cleanup, symmetry, and layers

Advanced tools handle repeated changes faster and let you simplify the editing view without affecting the final exported chart.

Do this

  1. 1Open Color adjustment to delete unwanted colors or replace one used color everywhere.
  2. 2Enable vertical or horizontal symmetry when both sides should receive the same brush or eraser action.
  3. 3Use Layers to hide or fade the drawing and board while checking structure.

What each control does

Delete colors

Selects one or more used colors and clears every bead that uses those codes after confirmation.

Replace color

Selects one source code and replaces all of its beads with a used or full-palette target code.

Search and sort

Finds codes quickly and sorts used colors by least used or by color code.

Vertical symmetry

Mirrors brush, eraser, and rectangle edits across a movable vertical axis.

Horizontal symmetry

Mirrors edits across a movable horizontal axis.

Center or place axis

Centers the symmetry axis automatically or lets you drag it to an exact grid position.

Drawing layer

Shows, hides, or changes the opacity of the colored beads in the editor only.

Board layer

Shows, hides, or changes grid-board opacity in the editor; exported files keep their own render settings.

Color adjustment: delete and replace colors

Open Adjust Colors from the toolbar after a pattern has been generated. The dialog works on every matching bead across the whole pattern, so check the affected color codes and bead totals before confirming.

1

Delete colors from the pattern

Use this when small, unwanted color groups should become empty cells instead of being repainted one bead at a time.

  1. 1Select Delete Color at the top of the dialog.
  2. 2Search or sort the used colors, then select one or more color codes. The number badge shows how many beads use each code.
  3. 3Review the selected-color and bead totals, click Delete selected, and confirm the warning to clear every matching cell.
1 Choose Delete Color · 2 select one or more used codes and check their quantities · 3 click Delete selected and confirm the affected bead total.
2

Replace one color everywhere

Use this to merge a stray color into a nearby tone or move every bead of one code to another code without changing their positions.

  1. 1Select Replace Color, then choose the single used color that should be changed.
  2. 2Under Select the new color, choose Used colors for an existing code or All palette colors for any code in the active bead brand.
  3. 3Select the target color and verify the source-to-target summary.
  4. 4Click Confirm Replace to update every bead that uses the source code.
1 Choose Replace Color · 2 select the source code · 3 choose the target from used colors or the full palette · 4 verify the summary and confirm replacement.

Both operations are added to Undo history. Delete Color leaves affected cells empty; Replace Color keeps those bead positions and changes only their color code.

1 Open the Adjust Colors dialog · 2 mirror future edits around an axis · 3 simplify the editor view with layer controls.

Expected result

Repeated color or symmetry changes are applied consistently, while layer visibility remains an editor-only aid.

Step 8 of 10

Check bead codes and quantities

The Beads panel turns the current matrix into a shopping and placement reference, with totals for the whole project and each color.

Do this

  1. 1Open Beads and start with Used colors to review the material list for the current pattern.
  2. 2Select a color to highlight every matching bead on the canvas.
  3. 3Switch to All palette colors only when you need to inspect or select an unused code.

What each control does

Used colors

Shows only codes present in the pattern, with the number of beads required for each code.

All palette colors

Shows every available color in the active bead brand, including colors not yet used.

Color count

Reports how many distinct bead colors the current pattern uses.

Total bead count

Adds all non-empty cells to estimate the total number of beads required.

Color highlight

Dims unrelated cells and highlights every bead using the selected code so placement is easier to verify.

Selected color summary

Shows the code, color name, and current quantity for the selected or highlighted color.

1 Review distinct colors and total beads · 2 switch between Used and All · 3 select a code to highlight its placement.

Expected result

You have a complete list of bead codes and quantities and can visually confirm where each color appears.

Step 9 of 10

Download or publish the finished pattern

Choose how beads are drawn, then download privately as PNG or PDF. Publishing to the public gallery is a separate, clearly labeled action.

Do this

  1. 1Open Export and choose Square, Round, or Hollow bead rendering.
  2. 2Choose PNG for a shareable image or PDF for a printable grid with codes and material statistics.
  3. 3Use direct download for a private file; choose Publish to gallery only when you intend to make the pattern public.

What each control does

Square beads

Renders cells as a dense square grid that is easy to inspect at small sizes.

Round beads

Previews solid circular beads with visible spacing between cells.

Hollow beads

Previews round fuse beads with their center holes visible.

PNG download

Creates an image for sharing or viewing on a phone, tablet, or computer.

PDF download

Creates a printable chart with color codes, dimensions, and a bead shopping list; very large patterns use a large single page.

Author watermark

Optionally repeats your author text diagonally across the downloaded PNG.

Direct download

Saves only to the current device and does not publish the pattern.

Publish to gallery

Requires a pattern name, optionally accepts author and making notes, saves publicly, and downloads the PNG.

Android beta

Opens the separate Android tester recruitment flow; it is not required for web export.

1 Choose bead appearance · 2 select PNG or PDF private download · 3 use the separate publish action only for public sharing.

Expected result

A PNG or PDF download begins, and the pattern remains private unless you explicitly chose the public gallery action.

Step 10 of 10

Fix common generation and export problems

Most problems come from unsupported files, a subject that is too small, overly large grids, or a setting change that has not yet been applied.

Do this

  1. 1Read the message shown next to the affected upload, crop, generation, or export control.
  2. 2Return to the earliest failed step and reduce image size, enlarge the subject, lower grid width, or choose another method.
  3. 3If the issue continues, refresh the page and try a supported copy of the image before contacting support.

What each control does

Image will not upload

Confirm JPG, JPEG, PNG, or WebP and a file size no larger than 10 MB.

Subject disappears

Enlarge the subject in the crop preview or include more foreground pixels before generating again.

Generation is slow

Use a smaller source, reduce pattern width, or select Fast color for a quicker preview.

Colors look wrong

Try another bead brand or generation method, then correct specific cells with source color sampling and the brush.

Pixel grid is misdetected

Switch from detected pixel alignment to photo conversion, or re-upload and choose Photo instead of Pixel pattern.

Manual edits may disappear

Changing generation settings does nothing until regeneration; confirming regeneration replaces the current hand-edited matrix.

Large PDF printing

Use Poster or Tile in the printer settings when a large single-page pattern must be split across A4 sheets.

Download does not start

Allow browser downloads, retry once, or choose the other export format before refreshing.

1 Read the file error · 2 correct the input and retry Upload Image · 3 use one of the listed supported formats.

Expected result

You can identify the failed stage and retry it without publishing or overwriting work unintentionally.

Ready to make your pattern

Create your own pattern while this guide is open

The generator runs in your browser. Start with a clear image, keep this guide in another tab, and work through the same steps with your own bead brand and board size.

Open the pattern generator

Still need help?

Tell us what you’re trying to do and at which step the problem occurs.

Email ushelp@pixel-beads.comContact Us